
"Quickly adjust monitor brightness and contrast by switching between predefined display modes."
If you use different monitor brightness and contrast for day and night, for work and gaming, or movie watching, you may currently be adjusting your monitor through its OSD menu or using software with slider bars. If you find this process annoying, it is time for a change.
No more OSD menus or slider bars; simply click to switch.
With Monitor Brightness Switch (MBS), you can easily switch your monitor to predefined display modes with simple clicks. You can define these display modes according to your preferences, each tailored with specific brightness and contrast settings for various environments or situations.
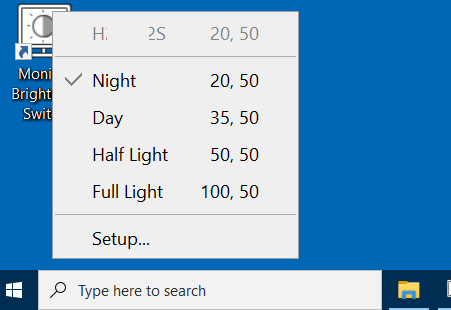
Every time you start MBS, a main menu pops up with those display modes. You choose one of them to let MBS set brightness and contrast to the defined values.
MBS changes brightness/contrast of the monitor hardware directly, not some software simulated effects. This ensures the monitor always works in its designed state and there won't be any kind of color distortion.
To be adjusted by software, a monitor must support DDC/CI. Most modern display devices support that interface. However, some monitors could have it disabled by default. You will need to enable it, if MBS shows "Not supported" for a monitor. See Troubleshooting.
It's so easy to switch to a display mode: you launch this software from the desktop or start menu; it pops up a main menu with the defined display modes; you choose one of them to switch to a mode; it adjusts the monitor to the specific brightness and contrast in that mode.
It's highly recommended to pin MBS to taskbar, then you can launch it with a single click on your taskbar.
MBS provides several example display modes after installation, such as "Day", "Night", "Half Light" and "Full Light". Those display modes can be used directly, but it's not recommended. You should define your own display modes for your monitors, see the next section Define display modes for why and how.
The software is installed with several example display modes, which can be used directly but normally shouldn't. Why? Because every monitor has its own luminance. For example, the mode "Night" (20% brightness) can be too bright on some monitors, but too dark on some others. Therefore, the suitable brightness value for "Night" depends on the specific monitor.
Another reason to define your own display modes, is that everyone's requirements vary. Rather than the examples "Day", "Night", "Half Light" and "Full Light", you may want to define display modes like "Work", "Playing Games", "Watching Movies", etc.
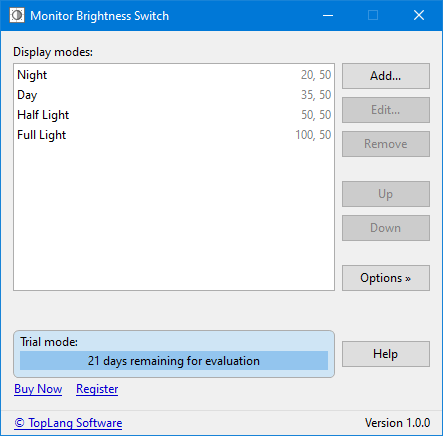
To modify or create display modes, choose on the main menu to bring out the setup window. It lists all defined display modes in a list box. You can click the appropriate button to manage them or add new modes.
The list box supports context menu and common shortcut keys. You can right-click in it to show a context menu; or press key to edit the selected item, to select all items, to move selected items up, to move selected items down.
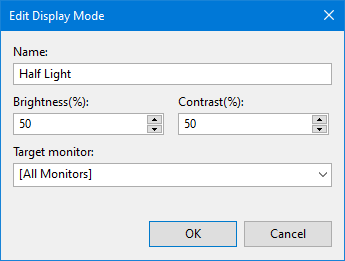
If you click to add a display mode or to edit the selected mode, an "Add/Edit Display Mode" window pops up, to let you specify the attributes of the new added or existing mode.
Every display mode should have a name, so that it can be listed in the main menu with its name instead of a simple "*". Although a mode can have no name (by leaving the name box empty), giving it a unique name to help identify it in the main menu is always recommended.
These 2 attributes are the major values of a display mode. They are the brightness and contrast to be adjusted to, when you choose the mode in main menu to switch to it.
They are not absolute values, but are in percent, e.g., 50 means 50%. However, most monitors use a range [0 - 100] for brightness and contrast. So in most cases, these percent values are in fact equal to the actual brightness/contrast values.
Value 0 (zero) is special. You should never try to set a monitor to 0 brightness or contrast, because otherwise the monitor will be completely dark ... at least theoretically. MBS doesn't allow switching monitors to 0% brightness or contrast, instead, it reserves value 0 for special usage.
Value 0 means ignore. MBS simply ignores a brightness or contrast of 0 when switching to this mode, keeps the old brightness or contrast unchanged. For example, if you set contrast to 0 for all modes, then switching to any mode doesn't change the current contrast of the monitor.
What will happen if set both brightness and contrast values to 0 for a mode? Apparently, nothing will change when switching to this mode.
Most monitors use 50 as the default value, especially for contrast. Contrast shouldn't be adjusted too far away from the default value; otherwise, the image on your monitor can be quite weird.
A display mode by default is available to all monitors, for it doesn't have a specific target monitor - the "Target monitor" is set to or blank. If a target monitor is specified, this mode will only be available to the monitor whose name matches the target monitor string.
If you have only one single monitor connected to the computer, there is no need to specify target monitor. This attribute is for multiple monitors environment, to let the main menu show different display modes for different monitors.
Let's use an example to explain further:
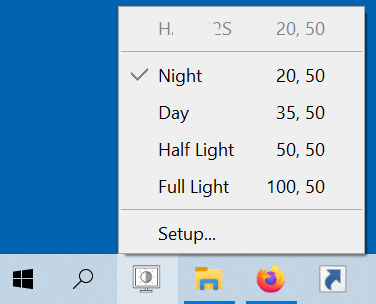
We have been using this convenient tool every day, and found out that using it as a pinned program on the taskbar, is better than using it from the desktop context menu. After MBS was pinned to the taskbar, you can use its quick menu by a single click.
However, Windows does not permit programs to pin themselves to the taskbar automatically. Therefore, please perform this action manually.
You can start this software by double-clicking its program icon on your desktop, then choosing a display mode to switch to. This is convenient enough, but it can be more convenient.
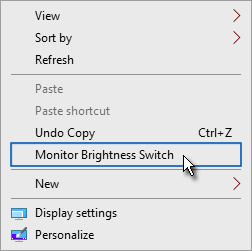
MBS can be added to the desktop context menu, so that you can right-click anywhere on your desktop, and choose this software to show and switch display modes.
It will be even more useful when you have multiple monitors connected to your computer. The software automatically detects the target monitor of the desktop, lets you switch display modes for that monitor directly.
Pin to taskbar is now recommended over this feature, so this feature is disabled by default after installation, you can enable it by clicking on setup window and then selecting menu item
The main menu can be personalized by clicking , then selecting a menu item under .
This software uses a scaled (larger) font for displaying its main menu, by default that's 120% of the default font size.
You can choose this menu item to change the scale value (in the range 100% - 200%). For example, If you set this value to 100, the main menu will use the default font size.
With this option enabled, the main menu will show information about current target monitor, such as its name, current brightness and contrast, as the top (first) menu item. Main menu will also show the brightness and contrast values of each display mode.
If you don't want to see the additional information, you can disable the option.
Disable this option if you don't want to see the menu item in main menu.
The main menu will have no entrance to the setup window if this option is disabled. You can use the setup program in start menu or installation folder to bring out setup window.
Disable this option if you don't want to see the in main menu.
This menu item and "All monitors" in the main menu are not available, when your computer has only one single monitor connected.
The menu lets you select a monitor to be target monitor, to switch display modes for it. If it's disabled, you need to start MBS on the desktop of the target monitor to let MBS automatically detect. This can be done by using desktop context menu. If you start MBS from the primary desktop, with this option disabled, you will not be able to select another monitor.
First of all, a fact is that not all monitors can be adjusted their brightness/contrast programmatically by software. MBS uses DDC/CI to communicate with target monitors. Your monitor must support DDC/CI and have it enabled.
If MSB shows for your monitor, or just cannot successfully set the brightness/contrast defined by display modes, please first make sure that the DDC/CI is supported and enabled. Most monitors support DDC/CI and have it enabled by default. However, it could have been disabled by accident.
To enable or make sure the DDC/CI is enabled, you have to use the monitor's OSD menu. This cannot be done in software level, not even in BIOS. The OSD menu can be very different for monitors from different manufacturers, and the option to enable DDC/CI can be in different places too (but normally it's under "System"). Contact the manufacturer of your monitor if you cannot find the DDC/CI option.
After DDC/CI has been enabled, try to use MBS again.
If MBS still doesn't work, it's possible that your monitor has incomplete DDC/CI support. Some monitors claim they support DDC/CI, but they actually just provide the basic level of support that can only allow OS to detect monitor name and resolutions. They don't support adjusting brightness/contrast by software.
In most cases, if you are sure the DDC/CI has been enabled, and MBS still cannot work, it's not necessary to troubleshoot further, not worth your time. No software product can work in all situations, please just stop using MBS.
This software supports color themes.
By default, theme is set to , which means MBS automatically detects and picks either "Light" or "Dark" theme, basing on current system color settings.
You can choose a theme by clicking then selecting in options menu.
MBS supports multiple languages. However, the language menu is hidden by default, because it has only one single language file (English) installed with it.
If you want to, you can create your own language files. Language files are in the sub-folder "Lang" of its installation folder. To create your language file, make a copy of the default language file "English.ini", then modify the copied file.
After a new language file has been created, the software has more than 1 language file. Next time you enter the setup window, the language menu will be available. You can click , then select to switch languages.
Do not delete all language files, otherwise the software will stop working.
MBS is designed to provide a user-friendly UI so that you don't need to use it in command line mode. However, it still supports command line parameters for advanced usages, e.g., creating scheduled tasks to switch to different display modes basing on current local time.
Show the setup window. This is also the parameter used by setup programs in start menu and installation folder.
Enable or disable desktop context menu, can be or .
Specify the target monitor to be operated on, e.g. . If this parameter is not provided, the default monitor is used.
Set brightness or contrast for target monitor, e.g. .
Specify a defined display mode, e.g. .
These parameters can work together. You can even use all of them at the same time. MBS will automatically merge them and perform all tasks with correct values.
Examples:
Switch the default monitor to display mode "Half Light", enable desktop context menu, and show the setup window.
Switch to "Half Light" but don't use the brightness in the mode, use the 22 specified by parameter /b instead.
Set brightness to 22 and contrast to 60.
Parameter /mode actually has no effect, because both the brightness and contrast in the mode have been replaced by the other 2 parameters.
In this example, the "S2340T" and "VG279QM" are monitor names. The mode "Work Day - S2340T" is a display mode with target monitor specified to S2340T. Because the target monitor in the mode doesn't match the target monitor specified by parameter /m, MBS won't load the mode for monitor VG279QM. So eventually this command just sets the brightness of VG279QM to 30.
MBS is not free software. Before you purchase a license and activate your registration, it works in trial mode for evaluation purposes only, and it will stop working when the evaluation period expires.
If the software is useful to you, please purchase a license to support our work: Buy Now
Your registration will be generated and delivered to you via email immediately following the placement of your order. You may then input your registration into the software to convert it to the full (paid) version. No additional download or installation is required.
To enter your registration into the software, click on the setup window.